How to Save a Full-Page Screenshot as a PDF in iOS 13

If you are an iPhone or iPad user, the latest iOS 13 software update adds an interesting new feature. With the Safari web browser, you can now take a screenshot of an entire web page (not just the visible portion on the screen) and save the web page to a PDF file. This article details the procedure for doing so.

I’ve found this quite useful on a few occasions where I want to save the contents of a web page that I come across on my iPhone, and then edit the PDF file later to extract specific pages or images that I want to use elsewhere.

Note, this feature is specific to iOS 13 devices and only works with the Safari web browser (not Chrome or Firefox, unfortunately).

Content-based File Naming with Win2PDF

*** NEW FEATURE ALERT ***

In our latest Win2PDF 10.0.58 update we added a new feature for content-based file naming. It allows a PDF file to be named based on a certain word or set of characters that reside inside of the document being printed.

Here is the customer situation that prompted the new feature:

A county sheriff’s department wanted to generate PDF files from a legacy AS/400 application. A secretary named the PDF files based on a document number that was listed in the original document, and because she did so manually it was time-consuming and error-prone.

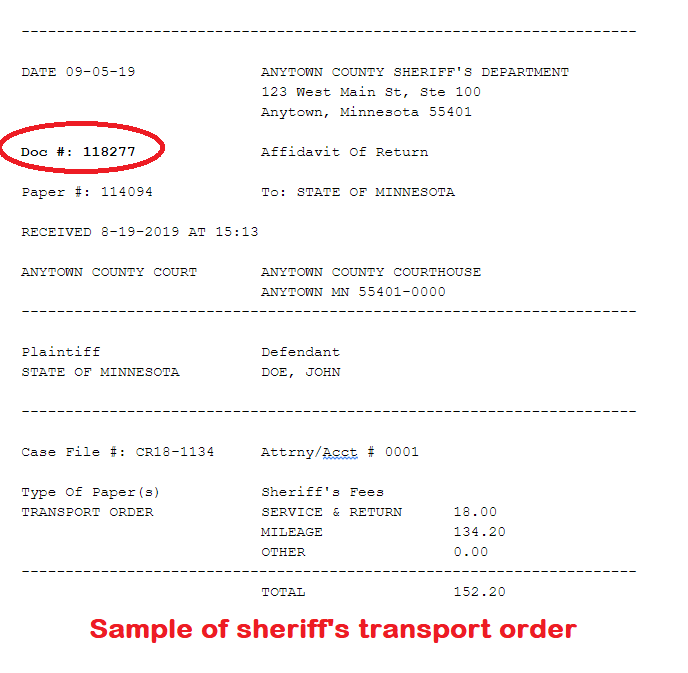
An example transport order from the sheriff’s department looked like this:

sheriff1

With the content-based file naming feature in Win2PDF, however, this process is automated. It allows Win2PDF to search the text of a document being printed, find a target search word, and use the following word as the PDF file name. It requires that PDF files contain text with a common search word that exists in all PDF files. (*Note: The “word” can be numbers or any character string that has a space before and after the “word”).

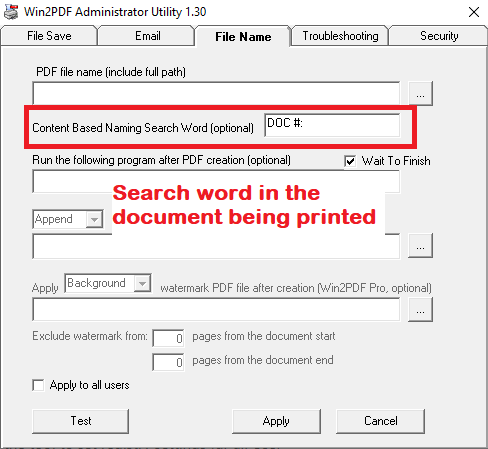
In the sheriff’s example, the content search word is specified as “DOC #:” in the Win2PDF Admin Utility.

sheriff2

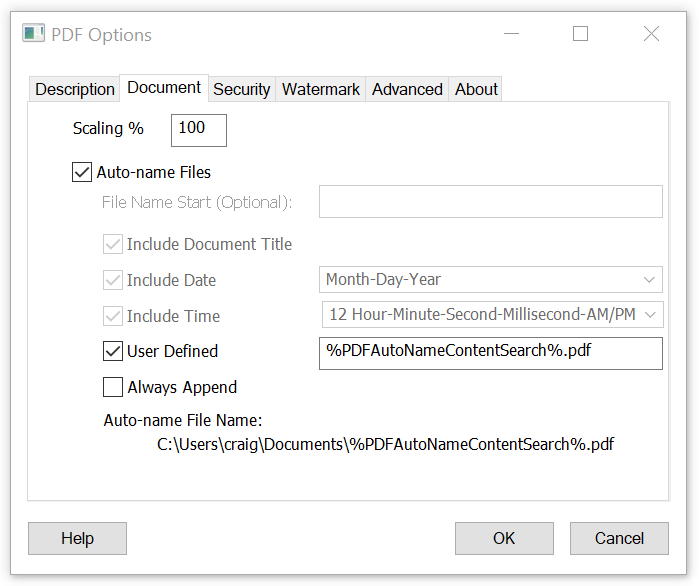
Then, in the Document section of the Win2PDF file save options, the “User Defined” field was enabled with “%PDFAutoNameContentSearch%.pdf” as the file name.

win2pdf-auto-name-content-based-naming

The result? When each file is printed, Win2PDF searches for the document number in the original file, and then automatically names the PDF file with this number. No possibility of manual errors or extra time involved.  In this case, the file was automatically named “118277.pdf” when the file was printed.

Again, this was a relatively simple modification that we were able to do for customer that had a particular need and had no ability to change the original AS/400 program printing the documents.

If you have a similar need, let us know and we may be able to help.

How to Create an Image from a PDF File

Suppose you have a PDF file that contains a certain page, photo, or diagram that you want to save as an image (to use in another document, for example).  How can this be done with Win2PDF?

When you install Win2PDF on your computer, it creates two different printers.  The most commonly used, obviously, is the “Win2PDF” printer.  But there is also a “Win2Image” printer that can be used to create image files in a variety of formats.

Win2Image and Win2PDF in the printers folder

The general process to save an image from a PDF file is:

  •  Open the PDF file in Adobe Reader, or any other PDF viewer application
  •  Select ‘Print’ from Adobe Reader and choose the printer named ‘Win2Image’

Select Win2Image in the Printers drop down menu

  •  Select the page you want to extract or save as an image

Select page number to extract and save as an image file

  •  Select the output format you want the new file to be.  You can save color or black & white versions in a variety of formats like JPG, TIFF, GIF, PNG, and BMP.

Select File format for the new image file

  •  Save

And that’s it.  You can now edit this new image file (crop, resize, etc.) with an image editor and insert it (if desired) into any other application.