Our latest release of Win2PDF Pro (10.0.60) has a couple of new enhancements to the watermark/background feature.
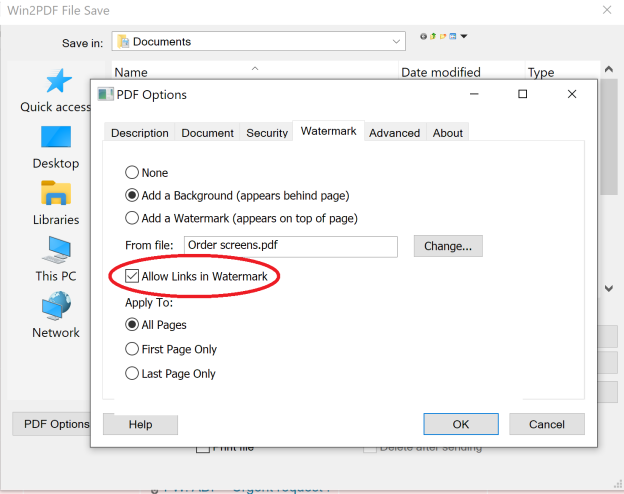
The first enhancement is that you can now apply a PDF watermark or background that contains a clickable link to an external web page. When you select the watermark in the PDF Options… you can check “Allow Links in Watermark” as shown below.
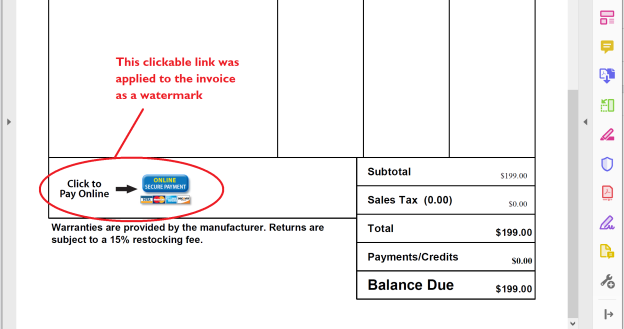
This can be quite useful for things like company letterheads, where you may wish to have a clickable link to the company home page. Or, you may wish to have a direct link in a PDF invoice that takes the customer directly to a payment page on your web site. Here is an example of what a PDF invoice would look like after a payment watermark has been applied.
We’ve heard from several customers who have needed this feature to automate their payments and invoicing process with Win2PDF.
These new features are now available in the 10.0.60 release of Win2PDF Pro*. If you have a licensed version of Win2PDF Pro, you can download the latest Win2PDF Pro Service Pack at the Win2PDF download page.
* The standard edition of Win2PDF does not have the watermark feature enabled. This is only available in Win2PDF Pro. Standard Edition users can purchase a Win2PDF Pro Upgrade if this feature is needed.
If you are an iPhone or iPad user, the latest iOS 13 software update adds an interesting new feature. With the Safari web browser, you can now take a screenshot of an entire web page (not just the visible portion on the screen) and save the web page to a PDF file. This article details the procedure for doing so.
I’ve found this quite useful on a few occasions where I want to save the contents of a web page that I come across on my iPhone, and then edit the PDF file later to extract specific pages or images that I want to use elsewhere.
Note, this feature is specific to iOS 13 devices and only works with the Safari web browser (not Chrome or Firefox, unfortunately).
In our latest Win2PDF 10.0.58 update we added a new feature for content-based file naming. It allows a PDF file to be named based on a certain word or set of characters that reside inside of the document being printed.
Here is the customer situation that prompted the new feature:
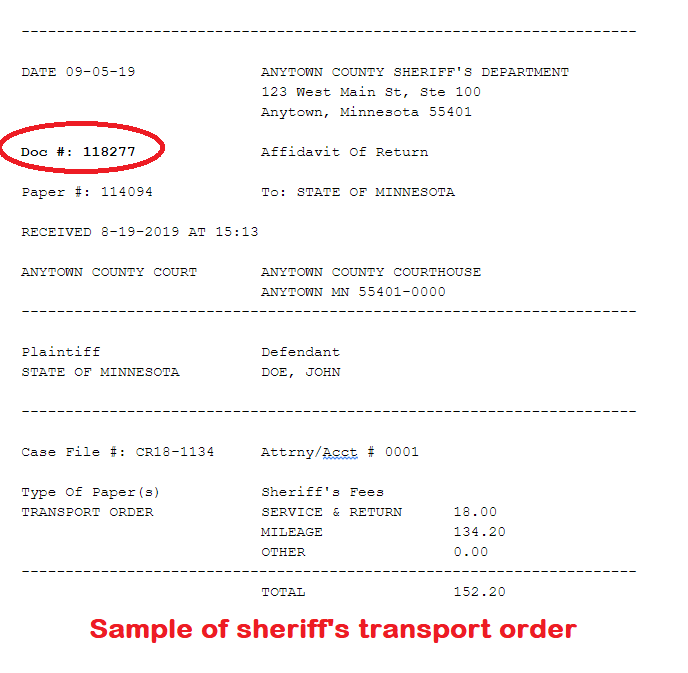
A county sheriff’s department wanted to generate PDF files from a legacy AS/400 application. A secretary named the PDF files based on a document number that was listed in the original document, and because she did so manually it was time-consuming and error-prone.
An example transport order from the sheriff’s department looked like this:
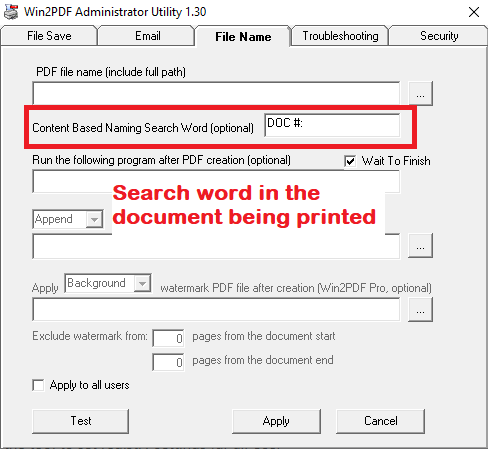
With the content-based file naming feature in Win2PDF, however, this process is automated. It allows Win2PDF to search the text of a document being printed, find a target search word, and use the following word as the PDF file name. It requires that PDF files contain text with a common search word that exists in all PDF files. (*Note: The “word” can be numbers or any character string that has a space before and after the “word”).
In the sheriff’s example, the content search word is specified as “DOC #:” in the Win2PDF Admin Utility.
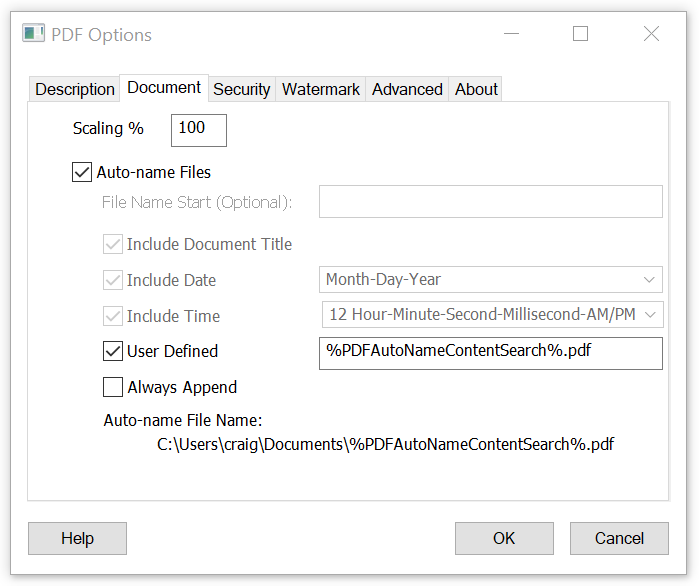
Then, in the Document section of the Win2PDF file save options, the “User Defined” field was enabled with “%PDFAutoNameContentSearch%.pdf” as the file name.
The result? When each file is printed, Win2PDF searches for the document number in the original file, and then automatically names the PDF file with this number. No possibility of manual errors or extra time involved. In this case, the file was automatically named “118277.pdf” when the file was printed.
Again, this was a relatively simple modification that we were able to do for customer that had a particular need and had no ability to change the original AS/400 program printing the documents.
If you have a similar need, let us know and we may be able to help.
In our last post, we talked about how Win2PDF can be customized for the enterprise. In this post, we’ll continue the theme of enterprise users but focus on how Win2PDF can be integrated with other applications or business processes.
First, all of the Win2PDF products make use of the standard Windows API for printers. This means other applications can print to Win2PDF automatically, without any user interaction. It does require some level of technical proficiency in programming, but there are a variety of programming environments we have documentation for, including Visual Basic (VB), Visual C for Crystal Reports, .NET, and Microsoft Access. For a broader perspective all all features, just visit the Developer Information section of the Win2PDF user guide.
This in and of itself is a powerful tool that allows enterprises to create PDF files with specific naming conventions, file locations, and output options automatically.
Other useful features for incorporating Win2PDF with enterprise processes are:
Post-action setting: This is a registry setting that can be set to allow the PDF created by Win2PDF to be passed to another program. This can be useful for doing a secondary step with the PDF file, like processing it into a document management, email, printing, or reporting application.
Command-Line interface: This was something we recently added and dedicated a blog post to it earlier this year. It supports simple command line access to Win2PDF for merging, compressing, extracting pages, encrypting, and a variety of other PDF functions.
Win2PDF Mail Helper: This free utility provides a SMTP mail client that can be used to send PDF files via email without user interaction.
Basically, if you have the ability to modify the application you are using to generate PDF files, using the integration options described here will give you the most powerful and flexible options to link PDF files into your workflow processes. If you do not have the ability to modify the application, then the customization options for the enterprise would be the best option.
Let us know if you have questions about these or any other integration issues. Again, if you can think of a situation where your PDF files can be incorporated into an enterprise process, there’s a good chance we’ve already figured out a way to make it happen.
Generally, Win2PDF has two main types of users. The first is the individual user who simply wants to use Win2PDF as a desktop printer to interactively convert a variety of documents to PDF files. The second type of user is an enterprise user in a company or larger organization. Often, these users need Win2PDF for a specific application, process, or to generate PDF files in a consistent way across their team or department.
Based on the support requests we receive, many of these enterprise users don’t realize the extent to which Win2PDF can be customized for their specific organization’s needs. “I didn’t know Win2PDF could do that?” is something we hear all too frequently.
Just consider a few examples that an administrator or manager of a larger group of users may wish to use:
Create a dedicated copy of the Win2PDF printer that prints and names PDF files automatically when used from a specific application, and save them in a specific network folder.
Have all PDF files automatically sent as e-mail attachments after they have been created.
For all PDF files generated, preset a Master Password that only the system administrator knows. [requires Win2PDF Pro]
Force certain default settings and disable certain interface fields that you don’t want users changing (i.e., “always save the file as a PDF/A file, in a specific location, and don’t allow the user to email or print that to a paper printer when it is being created”)
Many of these things can be enabled directly by the user or administrator with our free Admin Utility or free Mail Helper utility, or by using the Auto-name feature. Other things may require some level of customization in the Win2PDF setup program (particularly for large deployments).
If you are a manager of a enterprise group of users, let us know if there are particular things you want to do. In most cases, we’ve probably already had a similar request and can direct you to what options are available.
Another new feature in our latest Win2PDF 10.0.56 release is the ability to print to a Google Cloud Printer when you save a PDF file. If you’re not familiar with Google’s Cloud Printer, you can visit the Cloud Print product page for more information.
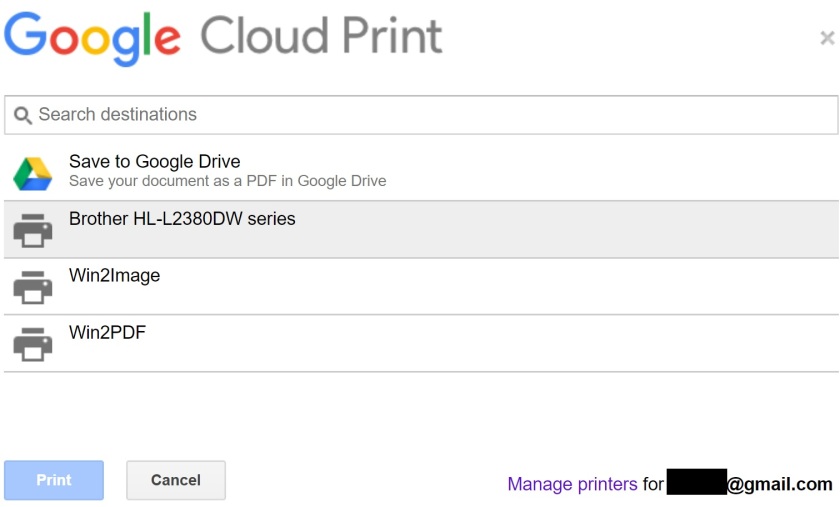
If you check the “Print file” option on the main Win2PDF file save window (shown below), and if you have Goggle Chrome installed, you’ll be notified that Google Cloud Print can be used.
If you select “Yes” to “Use Google Cloud Print”, Win2PDF launches Chrome after the PDF (or other format) is created.
The user can select a cloud printer, and the print job will be submitted to the cloud print queue. The Chrome printer selection also contains a “Save to Google Drive” option. This can be used to save the PDF directly to the cloud even if Google Drive is not installed on the PC.
If you select “No” to “Use Google Cloud Print”, Win2PDF will present you with list of local printers you can choose from, just as it has with earlier versions of Win2PDF.
While Google has a free “Google Cloud Printer” windows printer driver, it doesn’t allow saving to PDF or combining with other workflow options. Also, the “Google Cloud Printer” doesn’t support Windows Terminal Services, so Win2PDF Terminal Server Edition (TSE) may be the only option to print from an Windows native app to a Google Cloud Printer from a Citrix or Microsoft terminal server.
If you use Google Cloud Printers in your organization or home, this new feature gives you a great way to save a PDF and print in a single step.
Win2PDF 10.0.56 is available as a free update to registered Win2PDF 10 users.
The Win2PDF Auto-name feature makes it easy to customize the file name and automatically save a PDF without prompting, but what if you want the File Save window to appear so you can email, print, or manually change the file name?
We just released Win2PDF 10.0.56 (available as a free update to Win2PDF 10 users), and one of the new features is the ability to customize the default file name that is used to save PDF files in the Win2PDF File Save window. For example, in previous releases if you had a Word file named “Sales Report.docx” and you went to print it as a PDF file, the default name in the Win2PDF File Save window would be named “Sales Report.pdf”. You could always change this name, but there wasn’t a way to customize this name when you first entered the file save window.
This is now customizable. If go to the Document tab after clicking on the PDF Options… button, you see some new options.
When the the Auto-name Files option is unchecked, the settings in this window apply to the name displayed in the Win2PDF File Save window. You can add a fixed file name start, a date stamp, or a timestamp. Advanced users can customize the order of these items using the user defined setting.
In the screen shot example listed above, the month-day-year was added to the default “Sales Report” file name. While this option is set, the date stamp will be applied to all file names when you print to Win2PDF. You can automate your PDF workflow by creating multiple Win2PDF printers, each with different customized default file names.
The customizable PDF file name feature can save time by eliminating the need to manually type date or time information to the file name.
Download the new Win2PDF 10.0.56 software at the download page of our web site.
As a followup to last week’s post, one of our readers suggested another way of using Win2PDF to create a single tax-related archival PDF file. Here’s what she suggested:
Create a copy of the Win2PDF printer that is dedicated for saving tax-related documents. Call it something like, “Win2PDF – Tax Archive“
Change the Auto-name settings on this printer with the following options.
Set the file name to something like “Tax Archive.pdf“
Check the option to include date and set it to “Year Only“
Whenever you have a tax-related document you wish to preserve (like an email confirmation for an online donation, or a medical receipt), print this document to your “Win2PDF – Tax Archive” printer.
The document you print will automatically be appended to this 2019 Tax Archive.pdf file. When the new year arrives, it will create and start writing to 2020 Tax Archive.pdf. And that’s it. You’ll have one single PDF file to review before you do next year’s taxes.
If you’re like most of us, there’s nothing like the looming deadline of April 15th to rouse you into organizing your tax documents. Every year, I think I should have a better system of organizing my files to make it easier for the following year. While not perfect, I have made some progress through the use of a couple free Adobe apps, combined with the use of Win2PDF. Here’s one system I use:
First off, I rely on the free Adobe Reader DC software for my desktop PC, laptop, and even my Apple computer. The “DC” designation in this software stands for Document Cloud. It requires you to sign up for a free Adobe login to access the Adobe Document Cloud, but once you do, you’ll be able to access your saved PDF files from any device.
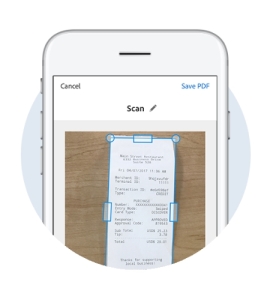
Second, I’ve really come to rely on the very handy Adobe Scan app on my phone (it’s available both through the Apple App Store or from the Google Play Store).
As the Adobe introduction page points out, “Adobe Scan automatically captures and cleans picture-perfect images of anything — receipts, forms, pictures, business cards, notes. Then, using built-in optical character recognition (OCR), it transforms them into smart PDFs, available in Adobe Document Cloud. Now, they’re easy to search and share from anywhere.”
With those 2 applications (plus Win2PDF) I can do a bunch of things to organize my tax documents (or any other documents). Here’s one suggestion for storing charitable donation receipts:
Scan paper receipts for charitable contributions (donation receipts, mailed letters, etc.) using Adobe Scan with your phone and save the files to the cloud.
On the desktop PC, access these files using the Adobe Document Cloud (via Adobe Reader DC).
Use Win2PDF to append any additional electronic documents (email receipts, other PDF files, etc.) and combine all of the charitable contribution receipts for the year in a single PDF file (e.g., to a file called “Charitable Tax Receipts 2019.pdf”).
Keep this document stored in the Adobe Document Cloud (or any other cloud service like Dropbox, Google Drive, etc.) and keep adding to it throughout the year as you make contributions and collect receipts.
When April 15, 2020 rolls around you’ll have a complete electronic file of your receipts. Voilà!
And, as a bonus, you can use the new Win2PDF command line features to extract specific pages or print specific pages if you need to in the future.
This works well for charitable contributions, but I also have been using it for non-tax purposes as well, such as:
Medical expenses and prescriptions
Home improvement expenses
My dog’s veterinary bills (and medical history)
Keeping a copy of Christmas cards we receive each year (while recycling all of the paper)
Recipes
Concert ticket stubs
You get the idea. Just scan and save from your phone, organize everything from your desktop, and store you collection of PDF files in the cloud. And best of all this is all FREE! Which is a very nice thing to consider, especially after tax season…
One of the most frequently requested features we’ve had over the years has been for a command line option to Win2PDF that allows existing PDF files to manipulated in a variety of ways. Well, the wait is over. Our most recent 10.0.48 release (a free upgrade to registered Win2PDF 7 or later customers) now has this PDF Command Line capability via our Win2PDF Desktop app.
What can you do with PDF command line options? Lots of things, including:
Extract text from a PDF file and save to a text file
Print a page (or range of pages) from a PDF file to a paper printer
View a PDF file in a Win2PDF Desktop preview window (does not require Acrobat Reader software)
Download the latest version and try these new features today. As always, if you have any questions or issues using these new features, let us know at our support site.

 First, all of the Win2PDF products make use of the standard
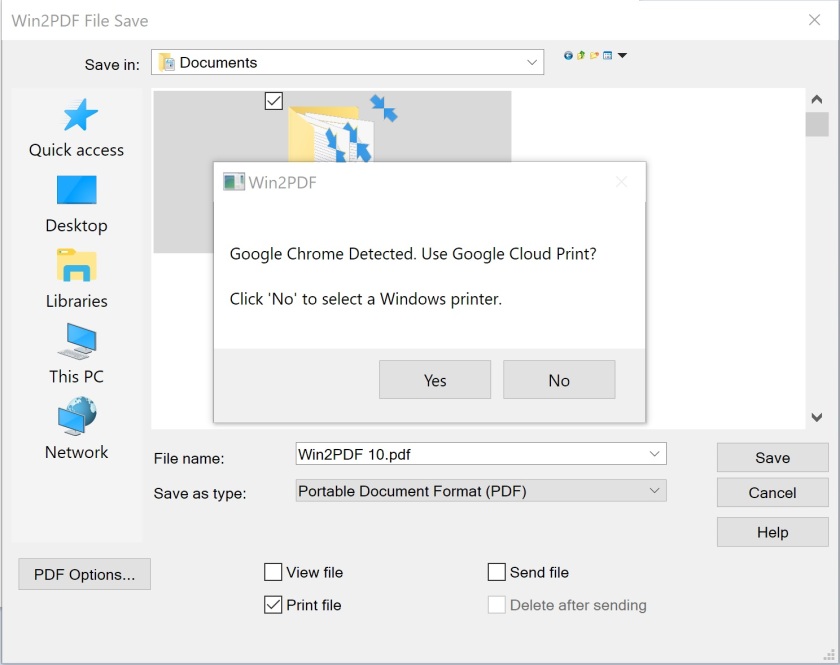
 The user can select a cloud printer, and the print job will be submitted to the cloud print queue. The Chrome printer selection also contains a “Save to Google Drive” option. This can be used to save the PDF directly to the cloud even if Google Drive is not installed on the PC.
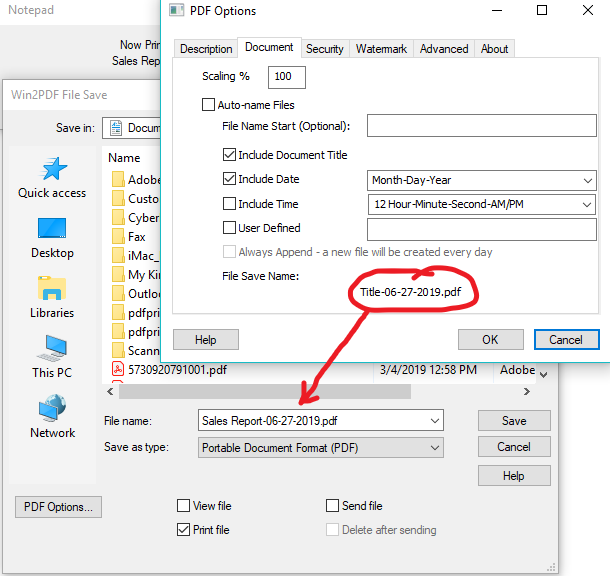
 Second, I’ve really come to rely on the very handy Adobe Scan app on my phone (it’s available both through the
 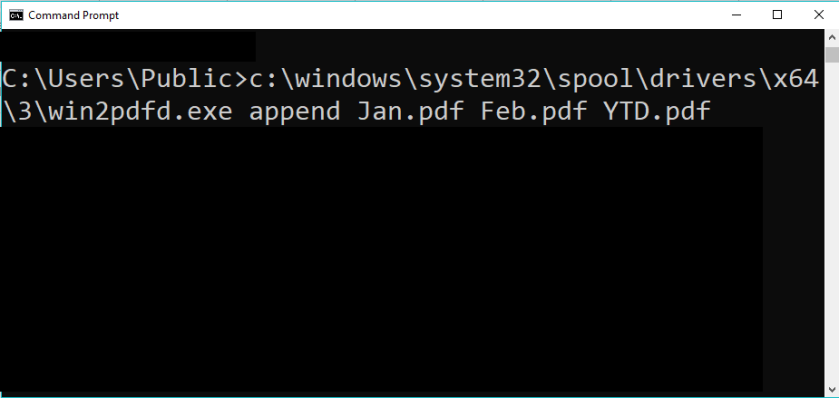 What can you do with PDF command line options? Lots of things, including: